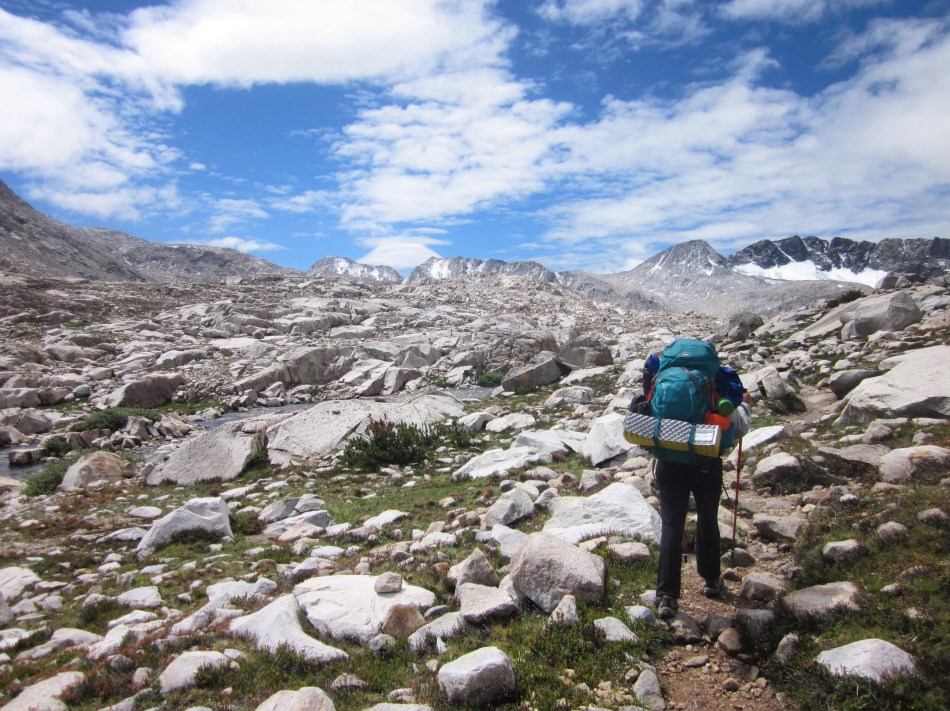
In 2015, I hiked 198 miles of the John Muir Trail from Tuolumne Meadows to Whitney Portal. For the most part, I was really happy with my setup. There are only a few items that I wish I hadn’t brought, or had brought in different form (hello 400+ page book). My bag was definitely heavier than it would be now, but I didn’t have the funds to upgrade to lighter gear at the time. While I am a supporter of UL gear, it is absolutely not necessary to ensure your success on the John Muir Trail. How much your bag weighs does not make you any more or less likely to finish the trail if you have the willpower to finish it.
So without further adieu, here is an entirely too-long blog post listing every single item that I brought with me on the JMT (no really, every single item), along with a few thoughts on how I used it, why it did or did not work, and a link to the specific item just in case you need to buy one for yourself!
BUT WAIT! As a thank you for checking out my blog, please find a FREE prinatable packing list PDF below:
Please note that some of the links in this post are affiliate links, where I get a percentage of whatever you purchase at no extra cost to you.

Gear:
Backpack – REI Crestrail 65
I brought the REI Crestrail 65 on my trip, which unfortunately is not made anymore. It was a really great bag and I loved it for five long years before finally replacing it with an ultralight bag. The size – 65L – was perfect, and I loved all of the exterior pockets!
Sleeping bag – REI Habanera
If you’ve heard about me talk about my sleeping bag before, you know that I am OBSESSED with this thing. It is relatively heavy for a backpacking sleeping bag (4 lbs – heavy, but not horrible), but what it lacks in optimal weight, it more than makes up for in warmth. I run cold at night, and this bag has a temperature of -15. Sometimes it is a little overkill during the summer, but then I just sleep with the bag unzipped. The temperature rating did come in handy for the trail though, as we woke up to snow not once, but twice on the trail! My hiking partner brought a 30 degree bag and had to bust out the emergency blanket on those nights. If you run cold at all, I would highly suggest a cold temperature bag. It more than makes up for the weight (in my humble opinion, of course).
Sleeping pad – Therma Rest Z-Lite Sol Ultralight Foam Pad
I rocked an accordion-style sleeping pad for this trip, which worked out great. These sleeping pads are light, insulated, and (relatively) comfortable. I enjoyed being able to use it as a seat while eating dinner at camp or sitting outside of my tent. I do think that inflatable sleeping pads are more comfortable, and I like how compact they pack down, but I can’t say that I would switch to an inflatable one if I were to go on another thru-hike. There really are pros and cons to each.
Tent – REI Half Dome 2 Plus
For my 17-day stint on the JMT, we brought the REI Half Dome 2 Plus tent. Although I have since upgraded to the NEMO Hornet 2, I will always love the Half Dome and often still use it for car camping. It may not be the lightest tent on the market, but it doesn’t break the bank, is light enough not to break your back, and this tent is durable AF (the one that I brought was 14 years old – aka, these tents don’t break).
Hiking Poles – Hiking Poles Found on Amazon (Not the ones that I used, but I don’t remember which brand they were – I found them in my parents garage and they were probably 15 years old)
I generally don’t use hiking sticks when I go hiking or backpacking, but I decided to bring them on impulse, and they totally saved me. I think because my backpack was so heavy at times (45 pounds coming out of Muir Trail Ranch.. dear god), my body was very prone to hunching and compressing over my chest. Hiking sticks forced me to open up my chest and have better posture. I used them every day, and I’m really glad I brought them!
Bear Canister – BV500
Bear Canisters are required throughout the Sierra – and for good reason. Sierra bears are ruthless when it comes to getting into food… Bear canisters are awkward as hell to pack, but they are required.
Rain Cover for Backpack – Waterproof Rain Cover
For my thruhike, and the first time that I went backpacking for more than two nights, I invested in a $5 rain cover for my backpack from Walmart. I did not think that that it was super important, but wanted to get something more sturdy than a trash bag (been there on a 1-night trip and was forced to bail and hike back to the car the very same day because water seeped through the trash bag and soaked my sleeping bag and warm clothes, not fun). I don’t know if karma had it out for me this trip, but it rained every.single.day that we were on trail, usually for about an hour in the afternoon (seasonal monsoons in the Sierra are no joke). My rain cover for my pack came in handy much more than I anticipated, and although my rain cover totally worked, I probably would have spent just a little more money had I known that I would need it so often.
Necessities:
First-aid Kit – Adventure Medical Kit
For as long as I’ve been backpacking, I’ve always used these Adventure Medical Kits. For the most part, they come with everything that I need, but I always add a few more bandaids, a tube of Neosporin, and nail clippers to my kit – I am very disaster prone, and tend to need more bandages and Neosporin than the average hiker (oops).
Headlamp – Cheap Headlamp
Funny story – if there is anything in this life that gives my dear, feisty British grandmother ultimate pleasure, it is yelling at her three granddaughters for not giving her what she believes to be a completed birthday list. As the eldest of the three granddaughters, I learned from a very young age to be very specific with my birthday list, so when I needed a new headlamp, I put “headlamp – don’t care which brand, doesn’t need to be expensive at all” on my list and called it good. Lo and behold, I still got a phone call from her saying, “I don’t know what this means! Do you mean a headlamp from the 99-cent store??” I legit think that she then proceeded to buy me a headlamp from the 99-cent store to protest my vagueness, and you know what? It is the best headlamp I’ve ever had. I’ve linked a cheap headlamp in the heading above, but I think the moral of the story is that most all headlamps are made the same, and there truly is no reason to spend more than ten bucks on one. Thanks, GMA.
Maps – National Geographic Yosemite SE: Ansel Adams Wilderness topographic map, Mammoth Lakes/Mono Divide topographic map, and Sequoia Kings Canyon National Parks topographic map
My favorite maps are, by far, the National Geographic topographic maps. They are super easy to read, waterproof, and “tear-resistant” (not entirely convinced about that, but I haven’t had any problems with any of them so far!). They actually have an entire John Muir Trail topographic map, but it comes in booklet form, which I don’t love. Instead, I elected to get three separate maps and absolutely love them, so if you too like big maps, I would recommend these three. Overall, if you are in the market for a new map, National Geographic is super on top of their map game.
Water Filter – MSR MiniWorks EX Microfilter Water Filter
I brought a MSR pump water filter on the JMT and do not regret the weight for a second. This thing may be heavy, but it is reliable AF. The filter that I brought was literally 13 years old at this point, and I still use it to this day. I have since switched to a Sawyer Squeeze filter to save weight, but if I’m being completely honest, I’m not in love with it and might switch back to the MSR pump soon.
*Edit* – I originally started writing this blog post about 5 months before I published it. Since then, my Sawyer Squeeze broke after using it on only TWO TRIPS, and I have officially switched back to my old faithful MSR Pump.
Water Bladder – 3L Camelback
I primarily used a 3L water bladder to carry my water. I find that I drink much more water when I am carrying it in a bladder and do not have to stop and get into my bag during water breaks.
Water Bottle – 48 oz Nalgene
I did bring a Nalgene as a tool to pump water and then pour it in my bladder, but there is so much water in the Sierra that I rarely ever had both my bladder and my water bottle full at the same time. The only time that I filled both my water bottle and water bladder was for Whitney, as pumping water in the Whitney Zone kind of grosses me out (if you know, you know).
Jetboil – JetBoil Flash Camping Stove
The JetBoil is a gift sent from the master hiking god itself. My JetBoil can boil 2 cups of water within 2 minutes or less, which saves fuel, time, and hunger pains. Since purchasing my JetBoil, I can probably count the times that I’ve used my MSR Pocket Rocket on one hand; with a JetBoil, there is no need. If you are a backpacker who has not invested in a JetBoil yet, you are doing it wrong (sorry not sorry). Tell your friends, tell your family, tell strangers on the trail. I’ll be right there with you, singing the praises of a JetBoil from every mountaintop in sight.
Pocket Stove and Pot – MSR Pocket Rocket Camping Stove
Part of my food list included rice sides, pasta sides, and spaghetti with dehydrated pesto sauce. Although we were bringing a JetBoil, these dishes all required boiling the food in water to cook it, and I didn’t want to dirty up my JetBoil with anything but water, so I decided to also bring my MSR pocket rocket. If I’m being honest? This was a total waste of space and weight. We used it maybe three times during the entire 17 days? We were too worried about using up too much fuel and the sides took too long to cook. For my next thru-hike, I will only bring my JetBoil and food that did not need boiling.
Fuel – Backpacking Fuel
Our longest stretch was 14 days, so we brought two full small cans of fuel to last us for the two weeks. We were really only using fuel at night to boil the water for our dehydrated dinners and in the morning for coffee, and since the JetBoil boils water so quickly, we had plenty of fuel left over. That being said, that did not stop me from grabbing a half-full fuel canister in the hiker box at Muir Trail Ranch… but I totally could have gone without it. I really don’t know what the magic number is for fuel canisters, but I suggest bringing as many as makes you feel comfortable.
Lighter – Bic Classic Lighter
Get a multi-pack from a gas station just in case you lose one!
Camping Mug – TOAKS Titanium Backpacking Mug
Alright, y’all. I’m about to drop some priceless backpacking knowledge on ya. Two words – powdered. gatorade. Powdered gatorade SAVED me on this trip (and probably every other strenuous backpacking trip that I’ve taken). There is really nothing quite like getting to camp after a long day, throwing down your pack, and chugging gatorade that you have made in your camping mug. The thought of it honestly got me through the last few miles of hiking each day. Now, I don’t drink coffee, so powdered gatorade was the only thing that I needed my mug for, but my mug is super light, so I didn’t mind bringing it. The mug that I have is a super old plastic mug that I could not find for sale on the internet ANYWHERE, so I linked a mug that I would probably purchase myself if I needed a new one. I like mugs that have handles so that I can clip them to the outside of my backpack, but really any old (light!) mug will do.
Spork – Light My Fire Camping Spork
My favorite spork is the Light My Fire camping spork. It is cheap, durable, and functional. Very easy to replace if necessary.
Knife – Pocket Knife
It always surprises me how many things that I use my knife for when I go backpacking. I never really think that I’m going to use it, but always bring it “just in case,” and end up using it multiple times. A knife is good for opening up food packages, slicing summer sausage, popping blisters (after sanitizing, of course), and for peace of mind when you are hiking solo and are irrationally afraid of mountain lions (what up).
Hand Sanitizer – Travel Hand Sanitizer
Necessary for washing hands before dinner, after using the bathroom, and on days where you feel especially gross. Also, a travel-sized sanitizer goes a long way.
Toiletries –
My toiletries included a toothbrush and toothpaste, deodorant, sunscreen, a hairbrush, and hair ties, all of which were travel-sized. It is surprising how refreshed you can feel after using all of these every morning and night, despite not showering for 14 days.
For my female readers out there, I did not bring any feminine products, which ended up being just fine. I was supposed to get my period during my hike, but I started my next month’s birth control pills to skip that period. I started very lightly spotting on my very last day coming down from Whitney, so in the future, I might throw one or two products in my bag just in case, but it all worked out in the end. Also, I know a lot of female hikers will get IUDs, which can stop your periods.
Trowel, toilet paper, and wag bag – Tent Lab Ultralight Deuce Trowel, Wag Bag
I don’t remember what kind of trowel that I brought on the JMT, but I do remember that it was one where the handle did not fold down, and it was super bulky. I have since switched to the Tent Lab’s Ultralight Deuce (lol) and highly recommend it. Regarding wag bags, I was told that there were plenty of wag bags at Crabtree Meadows (right before the Whitney Zone, which is the only area on the JMT where you need wag bags), but I wanted to bring my own just in case they were out. Turns out that there really were plenty of wag bags at Crabtree Meadows, but I wasn’t willing to risk it, and a wag bag is so light that I didn’t mind carrying one. ALSO – if you use your wag bag in the Whitney Zone, CARRY IT OUT. I saw far too many abandoned used wag bags along the trail. Don’t be that guy.

Clothing:
Two Running Shirts –
I brought two old Ragnar Relay technical short-sleeve race t-shirts to wear every day. It worked out fine – they were sweat-wicking and provided both sun protection and backpack-chafe protection. If I’m being honest though, I really only needed one. Within one day (or… one hour) of wearing each, they got super sweaty and retained their smell for the entire time. I think that I originally thought of bringing two with visions that I could “wash” one by dunking it into a river and letting it dry the next day, but I never did this. Embrace the stink and save weight – you only need one shirt.
Long-sleeve Hiking Shirt – Columbia Hiking Shirt
I brought a “technical” Columbia hiking shirt with me, but I literally only wore it once… and that was on the day that we summited Whitney and finished our trip. I absolutely did not need to bring this, but I will say that it was nice to have a “clean” shirt for the last day. I’ve convinced myself that it was also nice to have in the car after my dad picked us up at the portal, but he quickly rolled down the windows after we piled in, so I’m not sure how much it actually helped. If I were to hike it again, I might still bring this kind of shirt, but I think that I would bring it for sun protection rather than using it as its own shirt.
Hiking Shorts – Athleta Trekkie Shorts
When I hiked the JMT, I brought a pair of $8 green-denim shorts from Wal-Mart as my “hiking shorts.” Seriously.. I think that the brand was “Old Glory” or something. Now, I’m not above getting clothes from Wal-Mart, but hiking 221 miles in cheap denim was not the best move. They chafed like hell, but I suppose they got the job done. Since then, I’ve discovered Athleta shorts for hiking shorts, and my life has been changed. Highly, highly recommend Athleta clothing for hiking.
Two Pairs of Hiking Socks – Wildly Good hiking socks – 20% off with code MEGHIKES
I’ve talked at length about my woes and perils with hiking socks on my blog before, so I’ll spare you the details here. Basically, I wore a set of REI hiking socks that did not work for me. If I were to hike it again, I would definitely bring along a pair of Wildly Good hiking socks – 20% off with code MEGHIKES
Two Pairs of Hiking Sock Liners –
Again, I’ll spare you the gory details and allow you to check out my blog post all about my woes with hiking socks, but for the JMT I wore a set of REI hiking socks [AND SOCK LINERS] that did not work for me (sound familiar?). I’ll definitely be skipping these on my next thru-hike.
Hiking Hat – Mammoth Brewing Co. Baseball Cap
I brought a Mammoth Brewing Co. baseball cap for my hat on the JMT, but if I were to do it again, I might bring one that a) had some sort of neck protection (I got the most INSANE neck tan), and b) I wouldn’t care if it got sun-bleached as hell. Honestly, any old hat would work so long as you have some protection for your head from that High Sierra sun!
Leggings – Fabletics Leggings
I brought a pair of Fabletics leggings on my trip, and was really pleased with how they stood up! I’m not sure if all Fabletics leggings are made the same, but my pair is exceptionally thick. They kept me super warm at night and in the early mornings before hiking out. I would definitely recommend finding a thicker pair to take on your trip!
Fleece Jacket – North Face Fleece
I actually think that they do not sell my North Face fleece jacket anymore, which is a major bummer because that thing rules. Would highly recommend bringing some sort of fleece to wear under a puffy – it sure can get cold! (or snow!!)
Puffy – Cirq Down Jacket
I got my first puffy jacket off of The Clymb for like $40, so when it arrived and was too big for me, I really didn’t care enough to switch it out for a smaller size. I have since purchased a Patagonia puffy jacket (for only $50 from an REI Garage Sale – originally priced at about $250, what up), and like the fit a lot more, but this jacket did the job and you couldn’t beat its price point. Puffy jackets also work as great pillows while you sleep!
Beanie – Mammoth Brewing Co. Beanie
I was pretty much a walking Mammoth Brewing Co. billboard on the JMT. Be sure to bring a warm beanie for those cold nights!
Gloves – North Face Etip Gloves
I actually took a pair of Black Diamond gloves on the JMT with me, but I can’t find the exact pair that I took online (which is a huge bummer because those things rule – I actually bought a second pair about a year after I bought my first because I loved them so much). I tried to find a similar pair and linked them above!
Rain Jacket – REI Rain Jacket
Did I purchase an XL Children’s REI rain jacket to bring on the JMT because it cost at least $50 less than a Women’s size? Yes. Are rain jackets ridiculously overpriced? Also yes. BUT, you would be very miserable on a thru-hike in the Sierra without one, so definitely put some sort of rain jacket on your list!
Rain Pants – REI Rain Pants
On a whim, I grabbed a pair of rain pants out of the REI clearance section. Honestly, I think I wore them twice over the full 17 days. I probably would not bring them again, but they were nice to have on the two times that I wore them.
Sports Bra/Underwear –
I brought two sports bras and seven pair of underwear on my trip. I brought enough underwear so that for my longest stretch without a washing machine (14 days), I could wear a pair one day and then wear them inside out the next, and then move onto the next pair. This way, I always had a pair of “clean” underwear each day. Kind of gross, but worked for me.
Sleep Shirt –
Fun fact about me – I cannot sleep in a dirty shirt when I backpack. I brought an extra cotton shirt for sleeping in and would definitely do it again!
Sleep Socks –
See above re: sleeping in dirty socks. Cannot do it. Brought a separate pair of sleeping socks, and enjoyed every ounce that it may have added to my pack.
Hiking Boots – La Sportiva FC ECO 3.2 GTX Hiking Boot
I’ve written at length about my hiking boots in a previous post, but I wore the La Sportiva FC ECO 3.2 GTX Hiking Boot for all 17 days on the John Muir Trail! I absolutely love these boots and highly recommend looking for something similar (as they don’t make this exact model anymore.. ugh).
Camp Shoes – Mary Jane Crocs
Not gonna lie, I’ve recently noticed there are a lot of haters of camp shoes out there… and honestly, I cannot figure out why. I cannot even express how good it feels to finally get to camp and throw off those sweaty hiking shoes that you’ve been wearing all day long. My favorite camp shoes are a pair of Crocs Mary Janes. I actually received these as a joke-gift from my sweet college roommate, Paige, who absolutely LOVED crocs (much to my disgust). I gotta say though – I’m a changed woman. I now never go on a backpacking trip without my crocs. They are perfect for hanging around the campsite in or changing into after you are done with your hike. These crocs are lightweight, and since they have a strap around the top of your foot, stay on at all times! The pair that I listed are not the exact same pair that I have, but they are very similar.
Sunglasses –
I’m notorious for losing sunglasses, so I brought a super cheap pair with me on the trail. Worked out great!
Non-Essentials:
Journal – Paper Journal
I brought along a very light paper journal to write in every night. It’s amazing how much I have forgotten about since hiking the trail five years ago – so I absolutely love having that journal to look back on.
Book – The Girl You Left Behind by JoJo Moyes
Did I bring an entire 480-page book on the JMT? Yes. Did I also finish said book two days into our ten-day section, and then have to carry the finished book for eight long days? Also yes. Some hikers will discourage bringing a e-/book, but I would definitely recommend it. Although I was absolutely beat getting to camp each afternoon, we did have a lot of downtime in between eating dinner and going to bed. I really enjoyed reading (and then re-reading) my book. If I were to hike the JMT again (or for my next long hike), I will definitely switch out a paperback book with a few pre-downloaded books on my Amazon Kindle. The weight (and ability to bring more than one book!) was very worth it to me. Also, if you are looking for a book review – 7/10.
iPhone – iPhone 4 (lol)
Digital Camera – Canon Powershot Digital Camera
For my camera, I brought my little Canon Powershot digital camera (hey – it was 2015, okay?). The camera did its job and I got some good photos, but they definitely aren’t DSLR quality… even though I did own a Nikon DSLR at the time. Looking back, I wish I would have brought my Nikon and taken more time to get some really great pictures of the more remote parts of the trail. Since then, I’ve learned that camera weight is always worth it to me… I guess that means I’ll just have to hike it again!
Portable Charger – Anker Powercore
I brought along a portable charger on my trip to power up my iPhone when it started to get low on battery. I’m pretty sure I got mine for about $5 at Radio Shack before they went out of business, and I do not remember for the life of me what kind it was. That being said, it ran out of battery the day before we ended our trip.. so don’t sleep on the cheap stuff! I’ve linked a similar charger above.

Nice Kit List! I’m the same with sunglasses, I’ve lost so many in the past – especially if hiking alone. My buddy now reminds me to pick them up now. If he isnt with me, I take a cheap pair.
LikeLike
Pingback: Your 2021 Guide to Getting Permits for your Favorite Sierra Trails – MEG HIKES
Pingback: Pro Tips for the New Backpacker – MEG HIKES
Pingback: Your 2022 Guide to Getting Permits for your Favorite Sierra Trails – MEG HIKES
Pingback: Your 2023 Guide to Getting Permits for your Favorite Sierra Trails – MEG HIKES
Pingback: Your 2024 Guide to Getting Permits for your Favorite Sierra Trails – MEG HIKES
Pingback: My Complete Packing List for the High Sierra Trail – MEG HIKES